Shear / Scratch Tester 
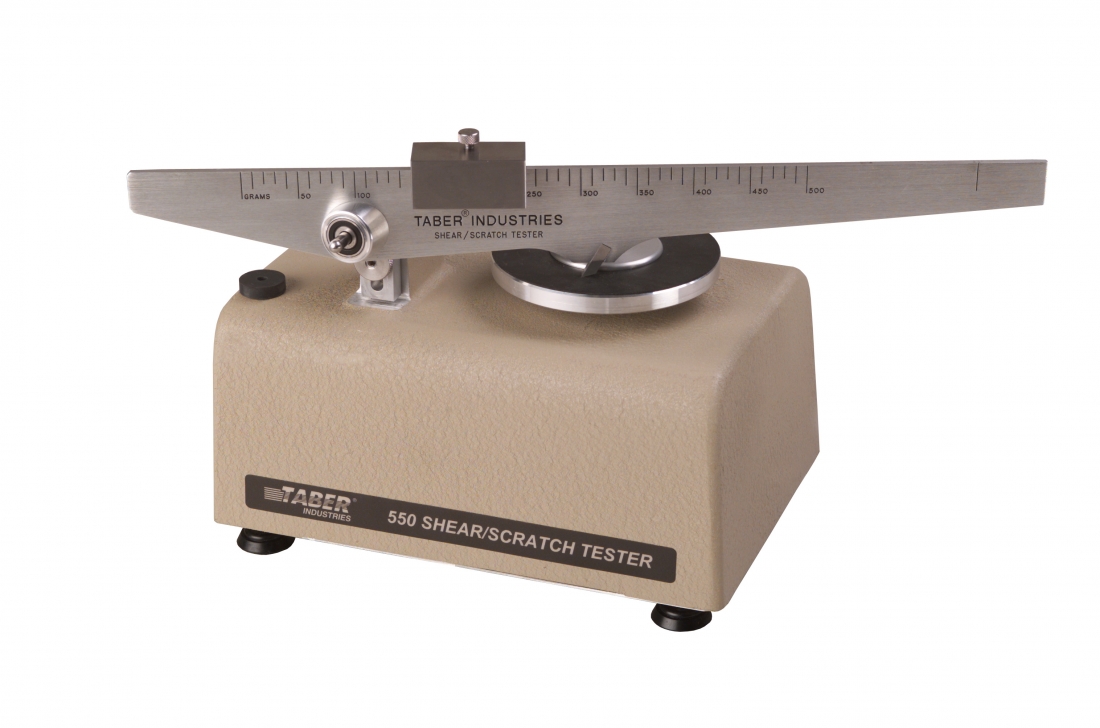
With the TABER® Shear / Scratch Tester, you can evaluate resistance to shearing, scratching, gouging, marring, scraping and engraving on a variety of flat, rigid specimens. It may also be used to test the relative homogeneity of materials, the adhesive qualities of protective coatings and the effects of age on similar materials.
Description
A removable scale beam is mounted on a pivotal shaft projecting from an adjustable gage block. An adjusting screw permits the height of the pivotal shaft to be raised or lowered, corresponding with the thickness of a test specimen up to 12.7 mm (0.5 inches). This adjustment allows the scale beam to be maintained in a level position in respect to the specimen and turntable. Designed with an integrated bearing, the scale beam can be tilted in a rest position enabling the operator to mount or remove specimens.

A calibrated sliding weight is mounted on the scale beam. By changing the position of the sliding weight, the load applied by the scratch tip (shear tool) can be adjusted between 0 to 500 grams. A second calibrated weight may be attached to the end of the scale beam, thus increasing the load capacity and changing the scale to 500 - 1000 grams. Engraved graduations are marked on the scale beam representing 10 grams per division.
Operated by an on/off switch, the motorized turntable rotates at a constant speed to ensure greater accuracy in test results. The turntable rotates in a counter-clockwise direction, but with a simple conversion the turntable rotation can be reversed (for more information contact Taber).
For materials sensitive to scratching, an optional Scale Beam Modified Weight Set is available that converts the scale by 1/10 to 0 - 50 gram range. To increase the testing load from 1000 to 1500g, an optional Scale Beam Fixed Weight is available. To satisfy EN 13310 (Kitchen Sinks - Functional requirements and test methods) an optional weight that provides a 15N load is also offered.
The Taber Shear / Scratch Tester is available in two models:
Shear / Scratch Tester - Model 550 (115V, 60Hz)
Model 550 operates at a speed of 0.6 rpm and includes cutting tools S-20 and 139-55.
Shear / Scratch Tester - Model 551 (230V, 50Hz)
Model 551 operates at a speed of 5 rpm, and includes cutting tools S-20 and 139-56. This instrument meets ISO, DIN, EN and other European test standards.
Scratch Tools
To evaluate a material's resistance to scratching or shearing, various tools are available for use with the Shear / Scratch Tester:
-
Conical Diamond tools (Models 139-55 and 139-56) are used for scratching materials of ordinary hardness. These tools are precision lapped to a 90° angle, and are available with a radius point of 3 mil (Model 139-55) or 3.5 mil (Model 139-56).
-
Diamond Scratch tool (Model 139-58) is used for scratch testing unusually hard materials. This tool is the converging point from three sides and edges of a perfect cube.
-
1.0mm Hemispherical Scratch tip is ideal for materials that are fragile or when a sharp cutting tool is too aggressive. Intended for use with model 550 or 551, this tool has a modified post and requires the Scale Beam Height Extension Kit.
- Carbide Scratch tip satisfies EN 14565 for resilient floor coverings. This tip includes a 45° angle and 0.25mm radius point.
-
S-20 Tungsten Carbide Contour Shear Tool is used for shearing tests. Precision ground, this tool features a cutting edge lapped to a 25mm radius (R25mm) with a 30° clearance. The edge is set at a 22° shear angle in relation to the rotation of the table and is designed to shear a groove up to 4.75mm (typical tests are between 50 to 100 mils in width).
-
Other shear tools include Model S-20-3 'Honda' Tungsten Carbide Tool (similar to S-20, but no radius) and S-20-4 Tungsten Carbide Tool (similar to S-20, but R2.6mm).
Over time, the scratch / shear tools will wear out. Due to material differences in the test specimen, there is no way to predict how long the tool will last. A Diamond Standardization Plate is also available to perform the standardization procedure referenced in historic versions of test method ISO 4586-2. These plates are manufactured from a high molecular weight polymethyl methacrylate (PMMA) cast sheet, and provide an inexpensive method to determine if the diamond tool is worn. Sold in packages of two, each plate is 4 inches square with a 1/4" center hole and is pre-dried and vacuum sealed.
Taber recommends that an extra tool is kept on hand for standardization purposes. If you have access to optical measurement equipment that offers an accuracies of ±0.01mm and ±1°, you can monitor the wear on your scratch tools. Inspect the tool at set intervals (e.g. every 250 or 500 tests), if any flatness or other kind of damage is found the scratching tool should be rejected and replaced with a new one.
Evaluation
For best results, conduct three to four tests on the specimen surface. Each test should be approximately 90° from each other (e.g. in the 12, 3, 6 and 9 o'clock positions) and at least 6mm in length. A 10x Measuring Magnifier is included with each Shear / Scratch Tester. This allows you to visually measure the width of a scratch to the nearest thousandth of an inch. For more precise measurements, TABER recommends an Optical Micrometer.
Diamond Scratch Test
The standard criterion for scratch resistance is the minimum load required to penetrate the surface of the testing material with the diamond tool. Alternatively an average scratch width can be calculated using a specified load, and results compared.
Shear Tests
The standard criterion for shear resistance is the minimum load necessary to shear the surface of the testing material with the contour shear tool with a typical width ranging between 1mm to 2.5mm. Due to the difficulty in cutting grooves of identical width, minor deviations can be compensated for by averaging the measurements.
Adhesion of Coatings
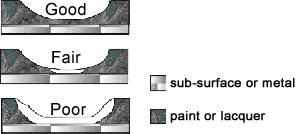
Using the TABER Shear / Scratch tester, adhesion of coatings can be rated. This is determined by recording when the tool breaks through the junction of the topcoat and the undercoat. See graphic for suggested ratings.

NOTE: An irregular or 'jumpy' cut not caused by careless test procedures may indicate lack of uniform composition or surface irregularities.
Test Methods
The following link provides a listing of test methods the Taber Shear/Scratch Tester satisfies. Please note, additional accessories may be required.

